TARGET: Process
| Requirements | Limitations | Considerations |
|---|---|---|
SMB+WMI (RPC) or WinRM enabled/accessbile on the target host | Targeting cmd.exe or powershell.exe with names instead of PIDs will kill the job itself | |
The hostname or IP of the target host | ||
Either the target process Process Id or Process Name |
TACTIC: Terminate Process (262 - [🔥Volatile Info] Terminate Processes)
1 - Create the Job
-
From the Metasponse web UI, navigate to
Job -> +New Jobfrom the top pane -
Name: Set a unique but descriptive name for the job
2 - Configure the Job
-
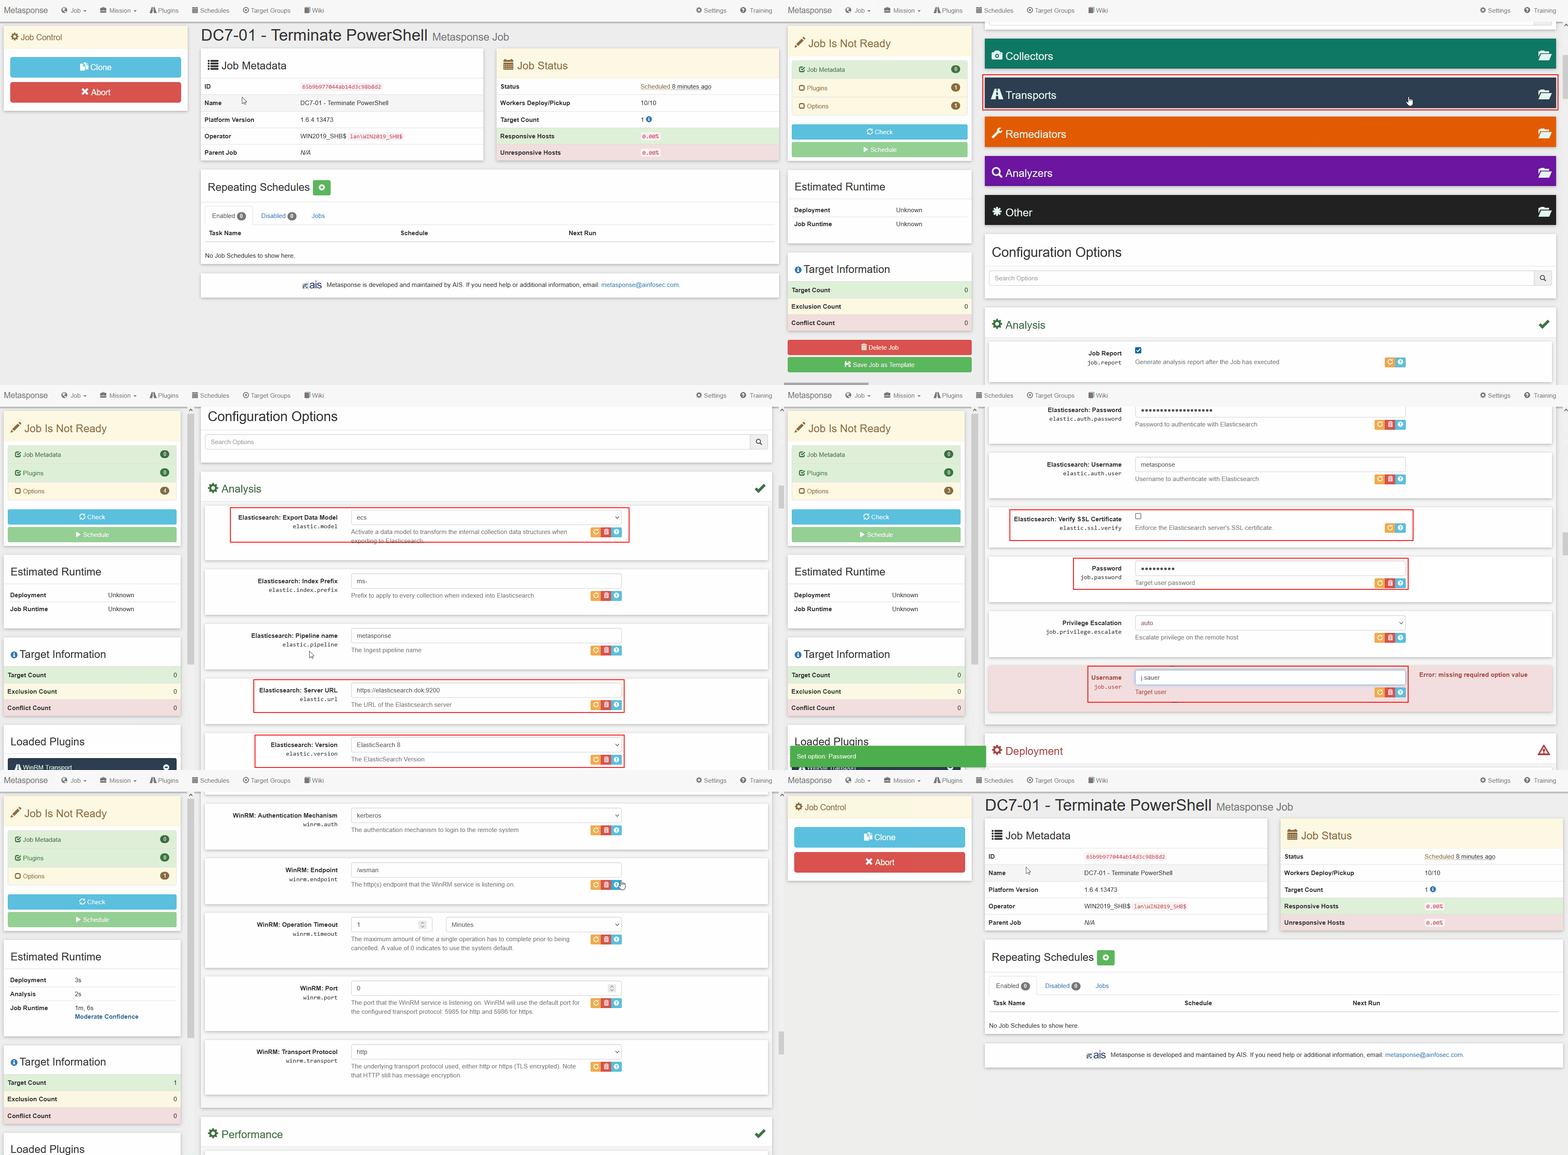
🚊 Transports- Select the following transport plugin(s):-
WMI Transport -
SMB Transport
-
-
🔧 Remediators- Select the following remediator plugin(s):-
262 - [🔥Volatile Info] Terminate Processes
-
-
🔍 Analyzers- Select the following analyzer plugin(s):-
Elasticsearch Analyzer
-
-
⛭ Authentication - Configure the following settings:
Setting Value DomainTarget authentication domain or workgroup Elasticsearch: PasswordmetasponseElasticsearch: UsernamePassword to authenticate with Elasticsearch Elasticsearch: Verify SSL CertificateUNCHECKED (False) PasswordTarget user password UsernameTarget user NOTE: DIP Kits configured IAW
262COS-DIP-SOP-001already have the Elastic usermetasponsepre-configured with the Kit password - otherwise you will need to manually create this user in Kibana withsuperuserprivileges -
⛭ Deployment - Target the host(s):
Setting Value Network Root\%WinDir%\Temp\262Physical Root%WinDir%\Temp\262Target AddressesThe target hostname(s)/address(es) NOTE: Changing the
Network RootandPhysical Rootfolders to a path with a known unique string will aid in whitelisting alerts that spawn from Metasponse activity -
⛭ Remediate - Target the process(es):
Setting Value 262 - Terminate Processes: Process Names/IDsA list of Process names and/or IDs to terminate.
3 - Execute the Job
-
Click the
⭮ Checkbutton on the left-hand to verify the job settings -
Click the
⯈ Schedulebutton on the left-hand column to execute the job
4 - Verify the response results
-
Monitor the Job status until the
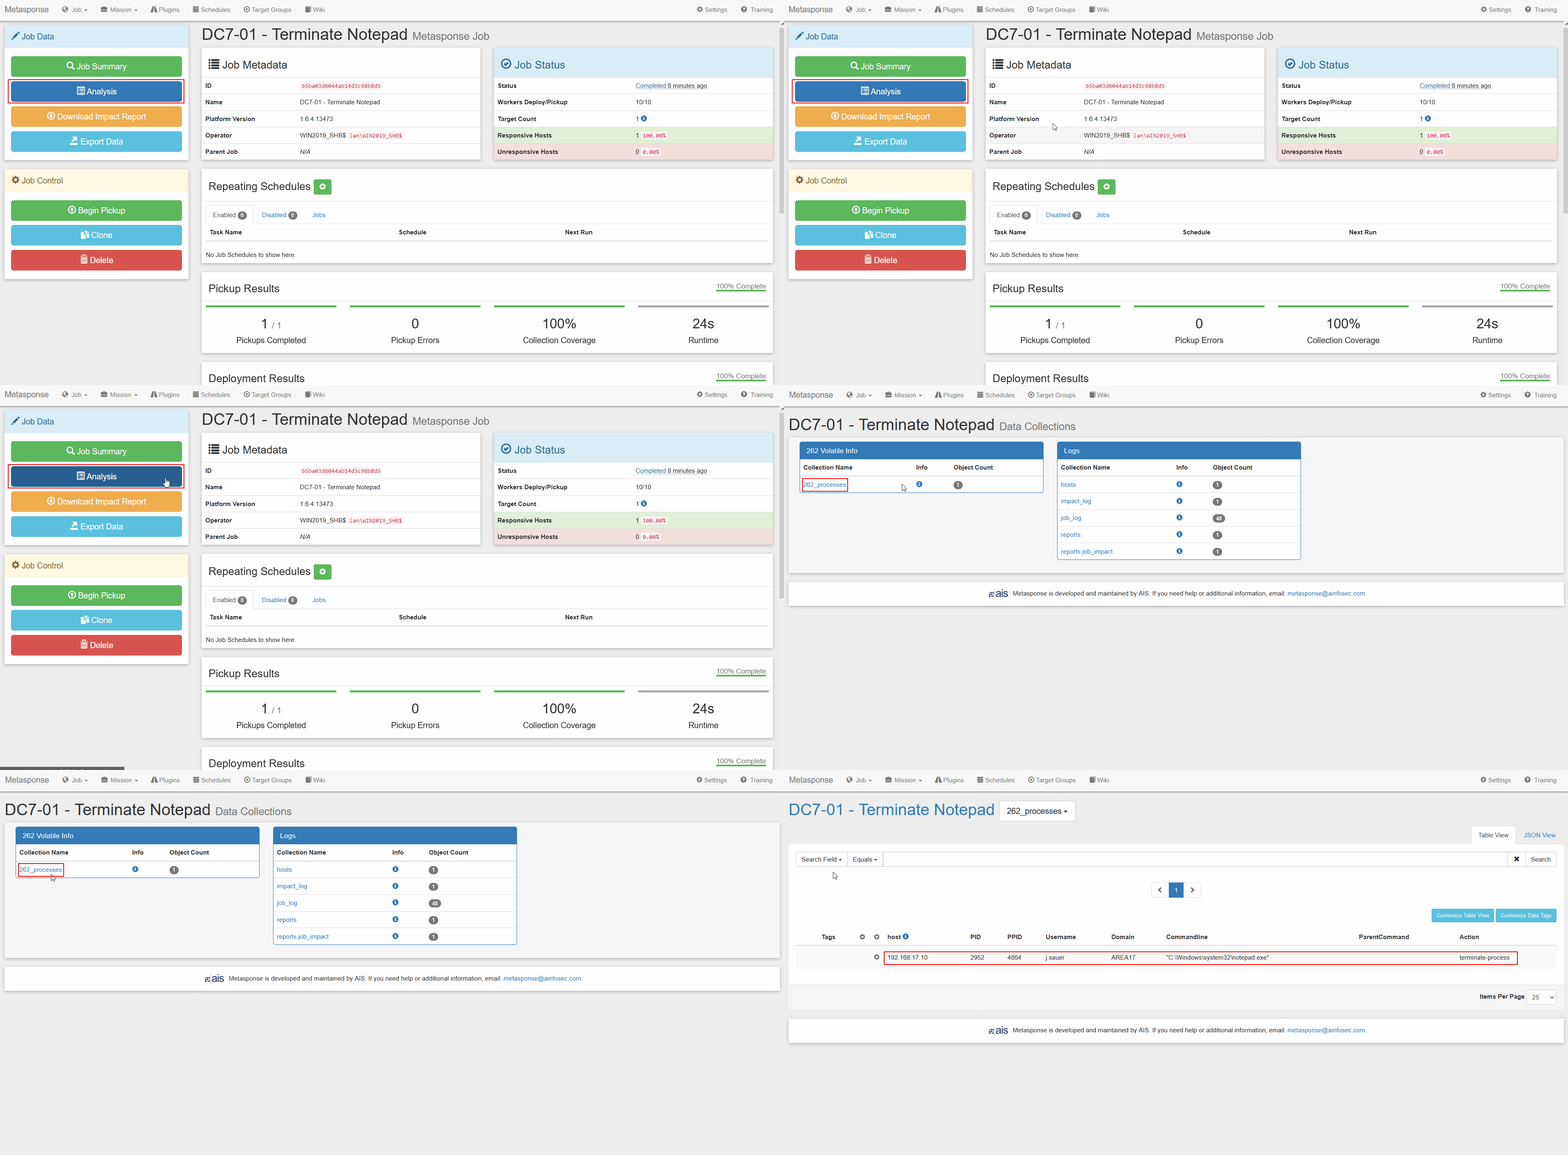
🗏 Analysisbutton appears, then click it to be taken to the Data Collections screen -
Within the 262 Volatile Info section, click on the
262_processesdata collection
NOTE: If the
262_processesdata collection is not present, then this indicates that no processes were terminated
- Verify that the list of processes matches your intended targets
TACTIC: Terminate Process (Basic Remediator)
1 - Create the Job
-
From the Metasponse web UI, navigate to
Job -> +New Jobfrom the top pane -
Name: Set a unique but descriptive name for the job
2 - Configure the Job
-
🚊 Transports- Select the following transport plugin(s):-
WMI Transport -
SMB Transport
-
-
🔧 Remediators- Select the following remediator plugin(s):-
262 - [🔥Volatile Info] Terminate Processes
-
-
🔍 Analyzers- Select the following analyzer plugin(s):-
Elasticsearch Analyzer
-
-
⛭ Authentication - Configure the following settings:
Setting Value DomainTarget authentication domain or workgroup Elasticsearch: PasswordmetasponseElasticsearch: UsernamePassword to authenticate with Elasticsearch Elasticsearch: Verify SSL CertificateUNCHECKED (False) PasswordTarget user password UsernameTarget user NOTE: DIP Kits configured IAW
262COS-DIP-SOP-001already have the Elastic usermetasponsepre-configured with the Kit password - otherwise you will need to manually create this user in Kibana withsuperuserprivileges -
⛭ Deployment - Target the host(s):
Setting Value Network Root\%WinDir%\Temp\262Physical Root%WinDir%\Temp\262Target AddressesThe target hostname(s)/address(es) NOTE: Changing the
Network RootandPhysical Rootfolders to a path with a known unique string will aid in whitelisting alerts that spawn from Metasponse activity -
⛭ Remediate - Target the process(es):
Setting Value Remediate: Kill ProcessesProcess image names or PIDs to kill
3 - Execute the Job
-
Click the
⭮ Checkbutton on the left-hand to verify the job settings -
Click the
⯈ Schedulebutton on the left-hand column to execute the job
4 - Verify the response results
-
Monitor the Job status until the
🗏 Analysisbutton appears, then click it to be taken to the Data Collections screen -
Within the Remediation section, click on the
remediatedata collection -
Verify that the WasSuccessful field is
truefor the actions against your intended target processes